THE FLUKES HYDROFOIL V3 CONCEPT:
The Flukes DIY-3 Hydrofoil is designed based on proven hydrofoil principles that ensure it will fly while also focusing on simple manufacturing processes that make it accessible for a DIY home project. The plans outline the dimensions for building the Front and Rear Wings and the Fuselage, to then be connected to a production aluminium mast.
Foil design plays a critical role in the foil's lift, speed, stability and maneuverability. Understanding that no individual foil design can best perform in all flying conditions, and a home-made foil will never be as refined as a production foil, the intention with the Model DIY-3 was to build a "all rounder" foil with a solid Fuselage and strong connection points that people can use across various disciplines and skill levels. The plan dimensions can be scaled up or down to adjust the wing size that best suits the discipline and rider should they choose to do so. Disciplines include; Kitesurfing, Winging, Surfing, Towing, SUP and Sail.
This Medium aspect foil is suitable for beginners through advanced riders. While different aspect ratios have recognizable benefits, the medium aspect is a good DIY starter wing. This foil Lifts smoothly, handles speed well and feels stable underfoot. It is a fun design to make and use.
Hydrofoil Construction:
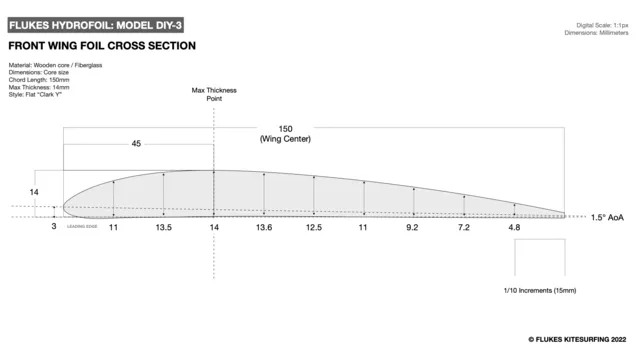
Hand-shaped solid wooden core wings laminated using epoxy resin and multiple layers of 6oz Fibreglass and Carbon fibre.
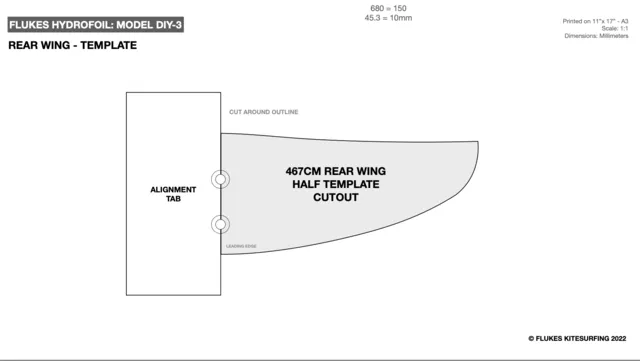
The design features flat bottom wings in both the profile and cross section of the wing. The flat foil design significantly reduces the processes and skills required to construct the hydrofoil wings, and it can be handmade from start to finish. (Without the use of a CNC or vacuum bagging)
The use of a solid extruded aluminium flat bar fuselage further assists the construction by minimizing significant errors that could occur. The wings attach to the opposing sides of the parallel aluminium Fuselage, so an appropriate angle of attack for flying is automatically obtained. This will create a hydrofoil that flies, even if the production of the wing shape varies slightly from the plans.
The Fuselage is drilled and attached to the wings using high-tensile Stainless Steel screws. Holes are also drilled to connect to an Aluminium Mast of your choice. In this case, specified to fit the Flukes Kitesurfing Production Aluminium Mast (and others that use the same M6, 40mm spaced drilling set-out)
A benefit of building the Fuselage in this way is to attach it to different lengths of production masts for different conditions, as well standardize the drilling layout to attach various wings to the Fuselage should you decide to build more wing shapes/sizes in the future.
We hope these plans help you build your first hydrofoil(s)! It is a rewarding project that you can have hours of fun all with the satisfaction that not only are you flying the hydrofoil, but you made it from start to finish.
DISCLAIMER: THE USER(S) ASSUMES ANY AND ALL RISK ARISING FROM THE USE OF THIS VIDEO, PLAN OR THE USE OF THE HYDROFOIL (AND ASSOCIATED NOTES) CONTAINED HEREIN. BY USING THIS INFORMATION, ONLY YOU ARE RESPONSIBLE FOR ANY LOSS OR INJURY. YOU AGREE FLUKES KITESURFING OR ITS OWNERS ARE RELEASED FROM ANY LIABILITY AND YOU CAN MAKE NO CLAIMS WHATSOEVER UNDER ANY CIRCUMSTANCES.